
Ever since I learned of the existence of Nixies at the age of 15, I have been fascinated by these devices. At that age, the price of the clocks was out of reach for me. Now that I am older, instead of buying one, I thought of making one. Or multiple, I should say.
The idea of creating my own Nixie clock started in the second year of my bachelor’s college, in which I would design my own PCB. With my limited knowledge of KiCad 5 and the unavailability (or so I thought) of footprints, I opted to use EasyEDA as my PCB design suite. Using EasyEDA was a bit of a pain, but at least I didn’t have to worry about footprints! The board utilized a full through-hole configuration in which the brain was an ESP32 DEVKIT V1 which pulled the time from an internet timeserver. The high voltage side was handled by a USB to 170V converter which worked great, and the IN-14 Nixie digit side was handled by Soviet K155ID1 chips powered by SN74HC595 ICs. This through-hole topology worked but was rather bulky, inefficiently laid out, and very dependent on components that are hard to source.
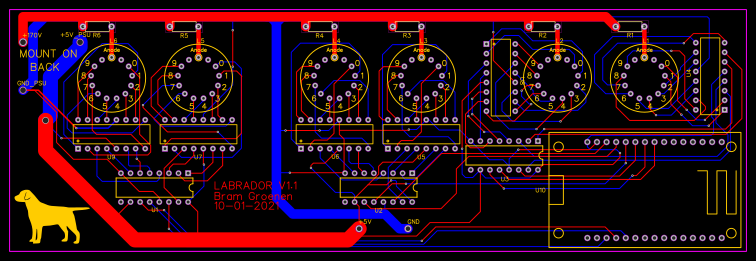
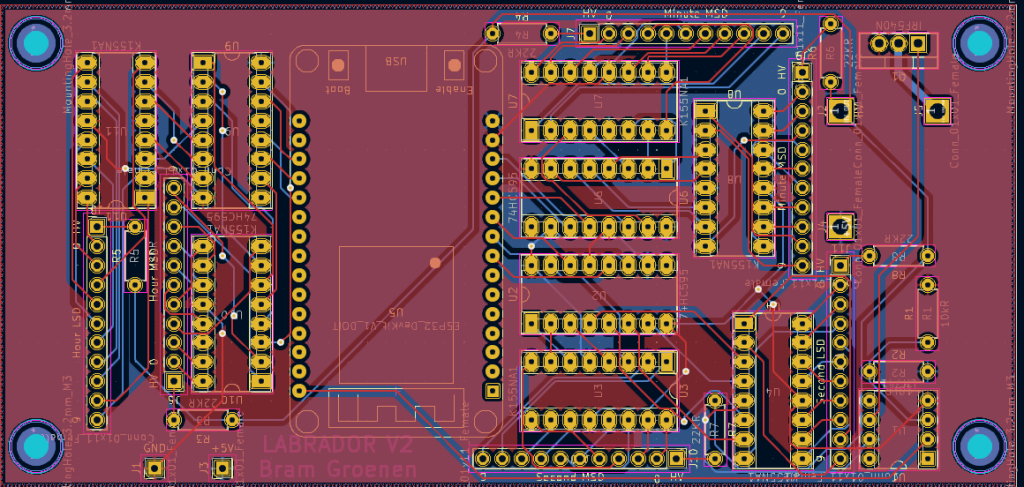
This was still a very primitive PCB made with no knowledge of constraints. Then came revision two, in which I wanted to challenge myself to get the circuit more compact and utilize power planes. This iteration used the same schematic for a big part, the only difference is that a UA741CN opamp and an IRF540N were added to control the DC/DC converter power. Instead of tube sockets onboard, a 1×11 pin header was used for each of the tubes, in order to have the sockets flush against the top of the enclosure.
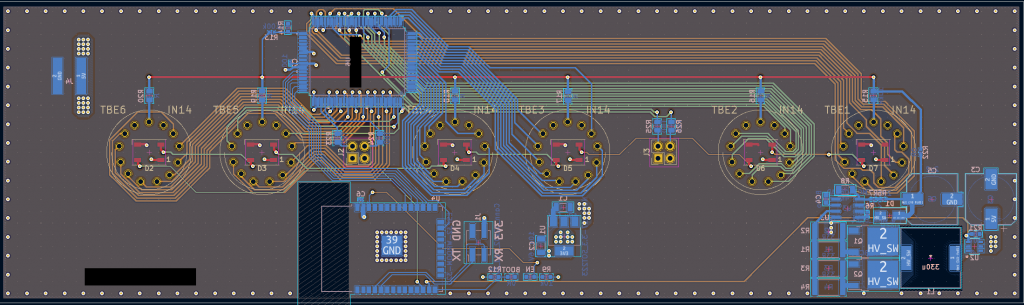
After this revision, I got promoted at my job to PCB designer, where I would get to learn the art of PCB design in a professional way. It helped me improve a lot on my PCB design skills and in the meantime, my circuit design skills had also been honed by progressing further in my studies. I had also been talking with my cousin about creating a well-built, feature-rich (should I add more buzzwords or did you lose me already?), modern-looking Nixie clock. I would take on the hardware part and he would take on the software. For this revision, I wanted to step away from through-hole components in order to make it possible to mount the PCBA (Printed Circuit Board Assembly) flat to the top surface of the housing. that in our minds, would look better. In order to do this, everything except for the Nixie tube sockets should be mounted with SMD components.
As we wanted to shift away from an off-the-shelf DC/DC converter, I decided to try my hand and design my own “step-up converter”, which ended up not working, so this revision did not work, however, the routing was more professional and the product did look better. Beneath the inductor, a keep-out region was made in order to limit eddy-current losses happening on the PCB, current constraints were met, the ESP-32 had a keep-out for its antenna, the edges had ground stitching and the step-up converter had a big amount of vias for the high inrush current. As the product is still in production, the name is blurred out and certain chip names have been removed. Apart from the non-working step-up converter, which operated more as a space heater due to its limited switching frequency, the product would not have worked anyways. This is due to the fact that I did not take into account that a lot of ICs do not operate at a 50% input voltage logic high or low but at different thresholds. This made it so that the addressable RGBW LEDs on top would not operate without a lower voltage on its input voltage and that we could not interface with our high-voltage Nixie driver.
Leave a Reply